Detailed Product Description
| Brand Name: | JUKI | Condition: | original new |
|---|---|---|---|
| Place of Origin: | Japan | Delivery Time: | within 1~3days |
| Minimum Order Quantity: | 1 | Packaging Details: | Paper |
| Machine Model: | JUKI FX-1 / FX-1R Machine | Year: | 2020 |
Teaching
Teaching is an operation for adjusting mainly a component position while monitoring its image.
Teachning operations are to be done for X and Y coordinates, the Z-axis and the shape of a mark, and you have to the HOD regardless of what to teach.
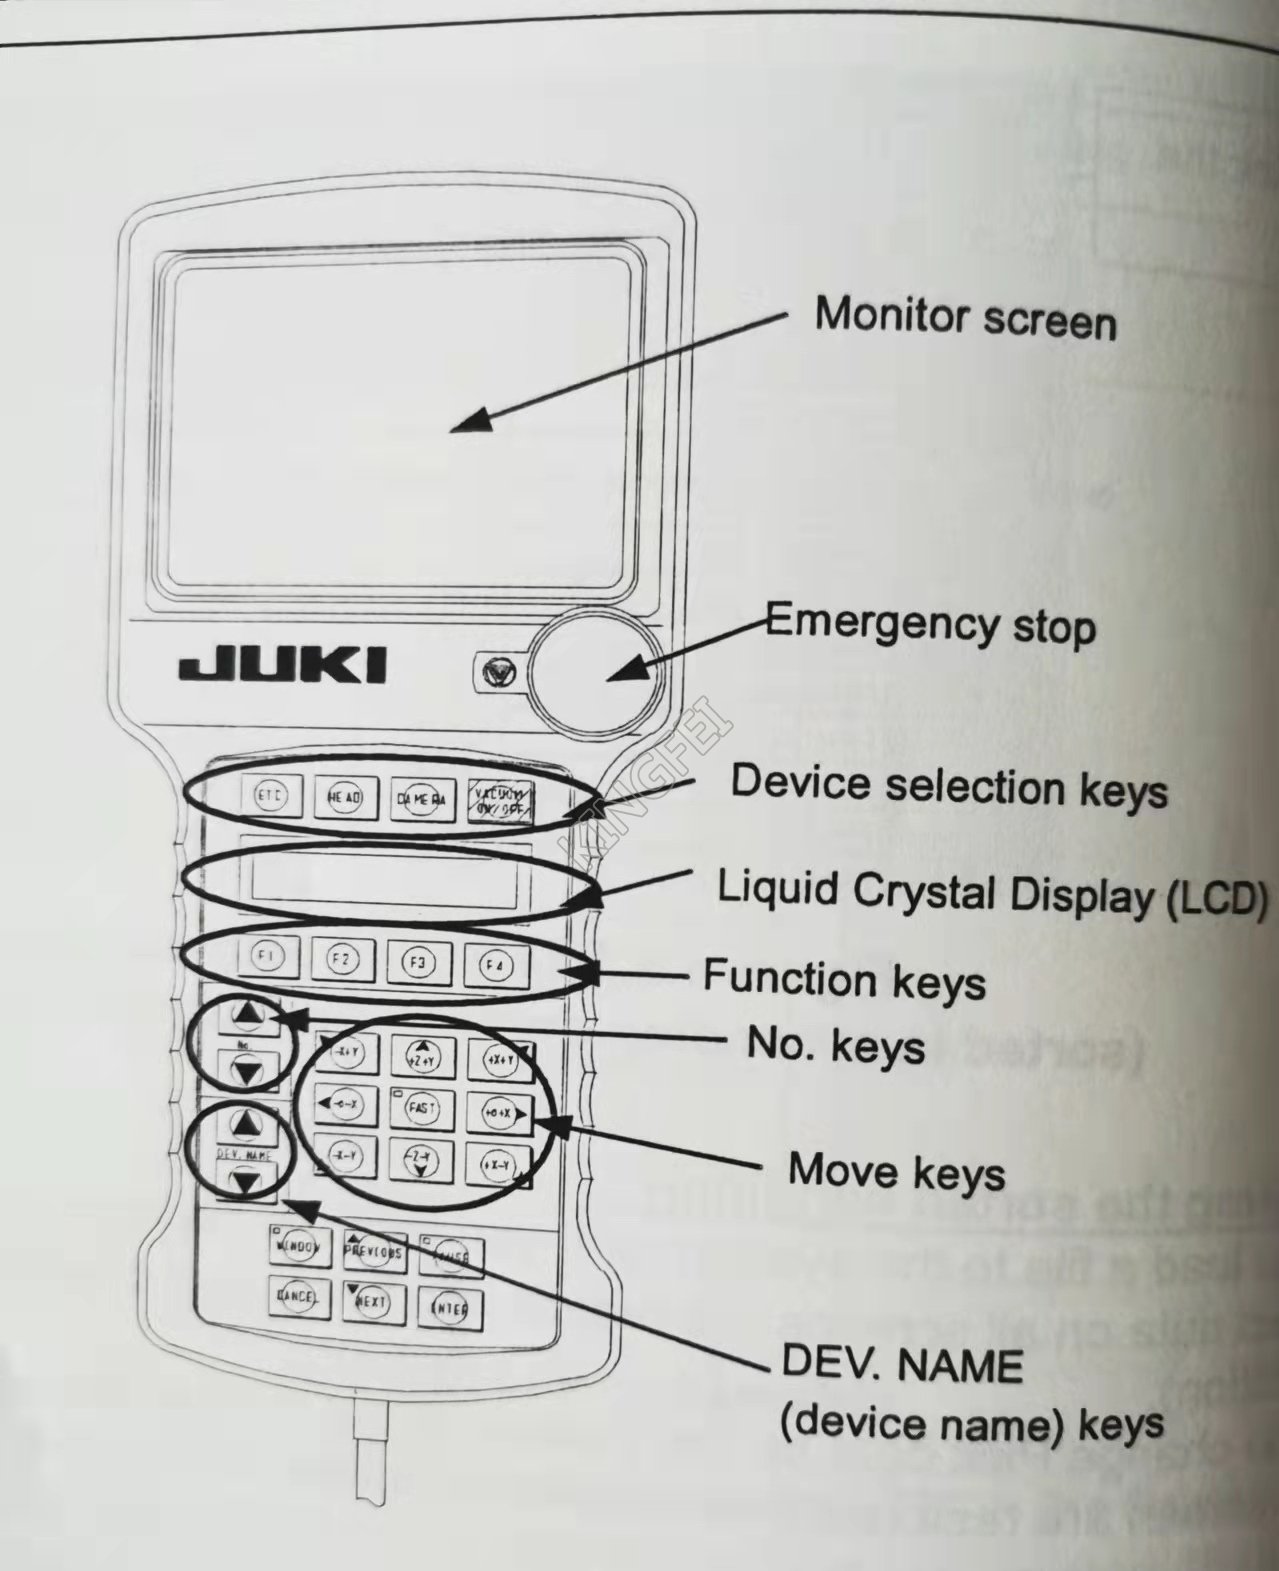
How to use the handheld operating device (HOD)

Operation procedure:
1, Use a trackball to select what to teach.
2, Press the " Device selection key" to select a device to be taught.
3, The LCD displays a slave device. Press the " function key(s)" to select a desired slave device (in case of a head, for example, "L1 head" appears on the LCD).
4, If you select the camera, the image shot with the camera appears on the monitor screen. while observing the image on the monitor, operate the " move keys" to adjust the position.
5, Press the <enter> key to validate the adjusted position, or the <cancel> key to cancel the adjustment.
If you select a "head" with the "Device select key." you can operate the "No. keys" and the "DEV. NAME keys.'
No. Keys: Select this key to teach the Z- or E-axis.
DEV.NAME keys: use these keys to select the support table or a bad mark.
If you select the camera with the "Device select key." you can select 1POINT, 2POINT, 3POINT, or WINDOW. Normally, 1POINT is used for teaching. Select another one when necessary.
2POINT: Specify two points to obtain the coordinates at the center point of these two points.
This setting is available also for a large component(6 mm or larger) that cannot be displayed within the monitor completely.
3POINT: Specify three points to obtain the intermediate value between the maximum X coordinate and Y coordinate and the minimum ones of these three points respectively.
WINDOW: this method obtains the coordinates of the center point with using a rectangular frame. When you select "WINDOW", a rectangular frame appears on the vision monitor. Operate the X and /or Y direction key(s) to adjust the position of the left side and that of the top side first, and then press the <enter> key. Next, adjust the position of the right side and that of the bottom side, and press the <enter> key. When you press the <enter> key once more, the adjusted rectangular frame is validated.
Teaching is an operation for adjusting mainly a component position while monitoring its image.
Teachning operations are to be done for X and Y coordinates, the Z-axis and the shape of a mark, and you have to the HOD regardless of what to teach.
How to use the handheld operating device (HOD)

Operation procedure:
1, Use a trackball to select what to teach.
2, Press the " Device selection key" to select a device to be taught.
3, The LCD displays a slave device. Press the " function key(s)" to select a desired slave device (in case of a head, for example, "L1 head" appears on the LCD).
4, If you select the camera, the image shot with the camera appears on the monitor screen. while observing the image on the monitor, operate the " move keys" to adjust the position.
5, Press the <enter> key to validate the adjusted position, or the <cancel> key to cancel the adjustment.
If you select a "head" with the "Device select key." you can operate the "No. keys" and the "DEV. NAME keys.'
No. Keys: Select this key to teach the Z- or E-axis.
DEV.NAME keys: use these keys to select the support table or a bad mark.
If you select the camera with the "Device select key." you can select 1POINT, 2POINT, 3POINT, or WINDOW. Normally, 1POINT is used for teaching. Select another one when necessary.
2POINT: Specify two points to obtain the coordinates at the center point of these two points.
This setting is available also for a large component(6 mm or larger) that cannot be displayed within the monitor completely.
3POINT: Specify three points to obtain the intermediate value between the maximum X coordinate and Y coordinate and the minimum ones of these three points respectively.
WINDOW: this method obtains the coordinates of the center point with using a rectangular frame. When you select "WINDOW", a rectangular frame appears on the vision monitor. Operate the X and /or Y direction key(s) to adjust the position of the left side and that of the top side first, and then press the <enter> key. Next, adjust the position of the right side and that of the bottom side, and press the <enter> key. When you press the <enter> key once more, the adjusted rectangular frame is validated.
Other Products


