Inspecting Vacuum Filter for dirt
Dec 28, 2021 Editor: admin
Checking the filter for dirt1) Check the vacuum pressure by the negative pressure gauge provided at the front of the equipment when the vacuum pump is in operation.
* Check it when a vacuum operation is not in progress.
2) If the value indicated with the meter is lowered to -80kPa or less(a value in the green range), follow the description of section"replacement of filter and blade: or
" Check/replacement of parts of the vacuum pump" to check /replace a consumable part(s).
Replacement of filter and blade(Hexagonal wrench and box wrench)
* The procedure below is applied to a KE-2070 whose revision is E or earlier, a KE-2080 whose revision is G or earlier or a KE-2080R whose revision is A or earlier.
1)Check whether the vacuum pump is not operated and whether it not at a high temperature after operation.
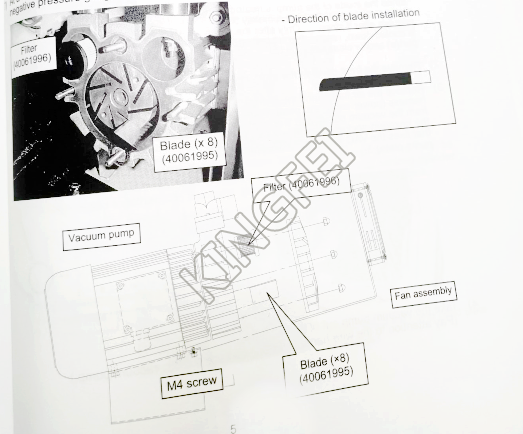
2) Remove the front cover of the main unit and loosen the M4 screws that fix the fan assembly at the front of the pump. Then, remove this assembly forward.
3) Remove the 4 hexagonal bolts fixing the pump cover with the box wrench and remove the cover.
4) Remove the filter from the hollow and check it for dirt. (If the filter is very dirty, replace it.)
5) Pull out the blade from the slit of the rotating part and replace it.(8-blade set)
* For the direction of the blade, refer to the following figure.
6) For installation, reverse the above procedure.
7) At a restart, make sure that any abnormal noise is not produced and that the value on the negative pressure gauge is -80 kPa or more.